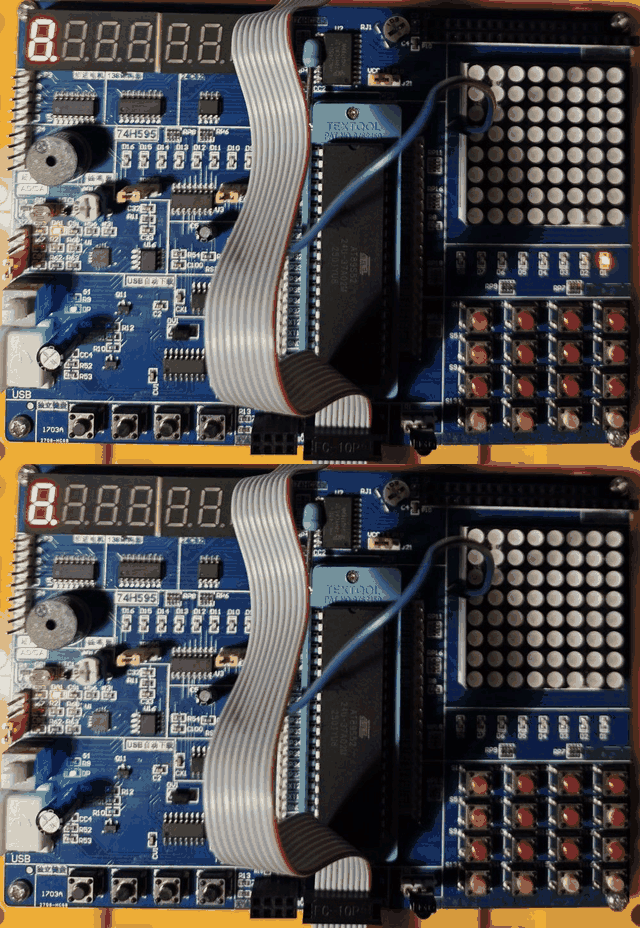
Every other post in this series, going back to the introduction and Hello World, has
targeted the STC89C52RC on the HC6800-ES / HC6800-ES2 dev-kit, flashed
over its UART bootloader with stcgal.
With China emerging as strategic competitor to Canada, the non-nerdy, obvious question comes up if anything we covered so far can be easily transferred on
a chip from America. Ok lets me honest, despite Trumps efforts, American Manufacturing, has abandoned the home base
and is making American retro stuff in Thailand (scroll past the HTS codes).
Ironically, Microchip decided to make the PDIP Version,
used in this post, in China. So if you want to craft your new NDAA attack drone out of an ancient 8-bitter, please
use the QFP version from Thailand.
It seems the Chinese masters behind the HC6800-ES development board foresaw that and made it compatible with
an AT89S52. The HC6800-ES was already wired for it. The board has a socketed MCU and a dedicated ISP1 header
that has sat unused under every STC89C52 demo in this series so far, and avrdude has shipped official
AT89S51/AT89S52 support since version 7.0.
All demo sources for this post can be found:
Everything I expected to be difficult (wiring, compiler target, part support) turned out to be fine. The two things
that actually cost an evening were a reset polarity inversion nobody warns you about, and an erase command that
reports failure while succeeding. Both are covered below.
Is the AT89S52 still a real part, or a museum piece?
Why would anyone in 2026 reach for a chip whose datasheet reads like it is from the Pentium III era? The STC clone
this series has used throughout is cheaper, runs the same core faster, and needs no external crystal on newer
variants. A few things I could pin down while researching this.
Can you still buy one?
- It is still listed as an active, in-production part. Microchip’s own product page still carries the AT89S52 (Microchip acquired Atmel in 2016 and kept the legacy 8051 lineup going). Distributor
search results I pulled while writing this show both QFP and PDIP versions as immediately
orderable.
Why you would still design one in
- The realistic reason to still design with it is BOM continuity, not new merit. The strongest case is sustaining a
design already qualified against the genuine part: access-control panels, alarm and security controllers,
coin-op equipment, and other long-lifecycle industrial gear from the era when “8051” meant Atmel. Swapping in an STC clone
mid-production means re-qualifying against a different (if compatible) silicon vendor, a different
security/lock-bit implementation, and a datasheet that, as noted in the GPIO topologies post,
does not always match reality for STC’s parts. For a product that is already shipping, “don’t touch what is
qualified” is a completely ordinary reason to keep buying the genuine part, even at a cost and clock-speed
disadvantage.
- A real SPI ISP interface is a production-line advantage the STC clone does not have. The STC89C52’s UART bootloader
is fine for a hobbyist with a USB-serial adapter. For automated manufacturing test it is awkward: entering it
depends on power-cycle and reset timing tricks, more fragile to automate than a bed-of-nails ISP fixture. SPI ISP
is what has programmed AVR chips in production for decades. A factory that already owns AVR ISP fixtures and
tooling can reuse them,
avrdude included, instead of standing up a second bootloader-specific process. That is
the answer to “why would I use avrdude on an 8051”: one programming toolchain across a mixed-MCU line instead of
two. - Officially documented lock-bit code protection. Both parts have some form of flash read-back protection, but the
AT89S52’s lock bits are documented directly by Microchip in the datasheet Atmel originally shipped, rather than
being community-reverse-engineered behavior of a clone’s security fuses. Where “can a competitor legally and
technically read out my firmware” actually matters, working from the vendor’s own documented security model is a
meaningfully different risk posture than trusting a clone vendor’s undocumented one.
Why avrdude, and why this is not just a drop-in
The STC89C52 is a clone of the classic Atmel AT89C52, and STC layered a proprietary UART bootloader on top of it.
That bootloader is the entire reason stcgal exists, and why the rest of this series never touches a hardware
programmer at all. The AT89S52 is a different, later Atmel part: same 8051 core, roughly the same peripherals, but
the “S” is a genuine SPI-based In-System Programming (ISP) interface. Electrically and protocol-wise that is the
same 4-wire scheme (MOSI, MISO, SCK, plus RESET) AVR chips use. The overlap is no coincidence, since Atmel
built both families, and it is why avrdude, a tool most people associate exclusively with AVR chips, can talk to
an AT89S52 at all. From the programmer’s point of view it is just SPI ISP frames, and any AVR
ISP programmer (USBasp, USBtinyISP, AVRISP mkII, an Arduino running ArduinoISP) already generates exactly those.
With one exception: the reset line. That is the reset polarity section further down.
avrdude support for the AT89S series
This part surprised me enough to dig into avrdude’s own history rather than trust a random forum post. avrdude did not always support the AT89S51/AT89S52. For years the only way to use it against these chips was to hand-append
a community-contributed part block to avrdude.conf. Several such blocks float around GitHub and old avrdude-dev mailing list threads, with slightly different signature bytes and timing parameters between them,
which is a little worrying. That changed with avrdude issue #1304, closed by PR #1310, merged upstream on 2023-03-21, which added official AT89S51/AT89S52 part definitions directly into avrdude.conf.in.
The details, now confirmed against real silicon rather than just against avrdude.conf:
Wiring: the HC6800-ES was already wired for this
On the classic 8051 SPI-ISP pinout, the ISP lines share pins with Port 1:
MOSI on P1.5MISO on P1.6SCK on P1.7RESET on the dedicated reset pin, held by the programmer during programming
That is the same 10-pin (2x5) header pinout as AVR ISP, see the image below
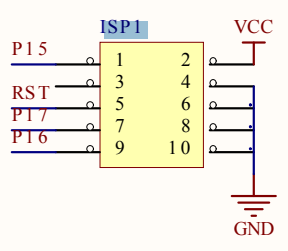
So no breadboard and no rewiring. Power off the board, pull the socketed STC89C52 and drop in an AT89S52, then
connect an AVR-ISP-compatible programmer to ISP1. Make sure to check the boards polarity before connecting.
A reversed ISP header is a very ordinary way to put 5V across MOSI/MISO the wrong way, and burn the chip.
Reset polarity
This is the detail that is missing from the “just use avrdude” forum answers, and that reading avrdude.conf does
not prepare you for:
What the programmer drives, and what the chip wants
An AVR ISP programmer asserts RESET by driving the pin low. Point one at an AT89S52 and you are not putting the part
into programming mode, you are holding it in ordinary hardware reset while sending SPI at it.
flowchart TD
    P["AVR ISP programmer asserts RESET by driving it LOW"]
    P --> T{"What is on the other end?"}
    T -->|AVR| OK["RESET LOW = programming mode"]
    T -->|AT89S52| NO["RST LOW = ordinary reset, SPI ignored"]
    NO --> D{"Does the avrdude driver send stk500_devcode?"}
    D -->|"-c avrisp, STK500v1"| INV["ArduinoISP sees 0xe1 and inverts its RST drive"]
    D -->|"-c usbtiny, no device code"| LOW["RST stays LOW, must be forced HIGH externally"]
avrdude does know about this, but it compensates on one code path only. The AT89S52 part definition carries stk500_devcode = 0xe1 (0xe0 for the S51). avrdude ships that byte in the STK500 set-device-parameters packet,
and the stock ArduinoISP sketch keys its reset drive off it:
rst_active_high = (param.devicecode >= 0xe0);
So -c avrisp against an Arduino-as-ISP works out of the box, because the sketch inverts the pin for you. Drivers
with no device-code concept, -c usbtiny among them, just hold RESET low, and nothing works. This is the one
I happened to have in the box for this. This needed some
workarounds, see the compatibility below.
Programmer compatibility
If you get this wrong, the symptom is deceptive rather than obviously broken. A signature read appears to succeed
while you hold the board’s RESET button down, because you are manually forcing RST high, and returns Device signature = 00 00 00 any other time. Nothing longer than a single command completes reliably, which sends
you looking for a flaky cable or a marginal clock.
Working around it with a USBtinyISP
The USBtinyISP is fixed active-low with no device-code path. My fix was to jumper the board’s RST to VCC for the
session, hoping the FET that pulls reset low would not drag the supply below the reset threshold. This is not a
production fix, for that pick a programmer from the table above.
SCK speed you do not need to worry about. The AT89S52 only requires SCK below f_osc/16, about 690 kHz at the board’s 11.0592 MHz crystal, and every programmer’s default is already well under that. The
USBtiny run below reports Using SCK period of 10 usec, i.e. 100 kHz. No -B tuning is needed.
Compiling with SDCC
The compile step does not change from the rest of the series, since -mmcs51 targets the 8051 instruction set
generically, not a specific vendor’s silicon. The companion project’s hello.c is an unmodified copy of the original 00_hello LED-blink-on-P2.0 demo. At the source
level, “AT89S52 instead of STC89C52” is purely a flashing-tool problem, not a compiler-target one:
sdcc -mmcs51 --Werror --std-c23 --out-fmt-ihx -c hello.c -o hello.rel
sdcc -mmcs51 --Werror --std-c23 --out-fmt-ihx -o hello.hex hello.rel
The companion project’s meson.build runs SDCC as a generator plus a link step rather than one command, see below.
The net effect is the same Intel-hex output as the single-command form in the original Hello World post.
Flashing with avrdude
With 89s52 as the part id, RST sorted out per the section above, and a USBtinyISP on ISP1, flashing takes two
commands:
avrdude -c usbtiny -p 89s52 -e
avrdude -c usbtiny -p 89s52 -D -U flash:w:build/09_hello.hex:i
The first command does erase the part, and it does print Error: chip erase failed. That is not a typo, and the
next section explains it. The second one needs -D so that avrdude does not attempt its own automatic
erase-before-write and fail the same way. The write itself is clean:
Reading 205 bytes for flash from input file 09_hello.hex
Writing 205 bytes to flash
Writing | ################################################## | 100% 0.75 s
Reading | ################################################## | 100% 0.27 s
205 bytes of flash verified
If you want to confirm the erase before writing, read flash back to a raw file:
avrdude -c usbtiny -p 89s52 -U flash:r:erased.bin:r
On a fully erased part that reports:
Writing 0 bytes to output file erased.bin
avrdude trims trailing 0xFF bytes from raw output, so a zero-length file is the success case, meaning all 8192
bytes read back as 0xFF. The read takes about ten seconds, which is the page size of 1 showing up again.
With an Arduino-as-ISP the erase works normally, and the two commands collapse into the single invocation you would
expect:
avrdude -c avrisp -P COM3 -b 19200 -p 89s52 -U flash:w:build/09_hello.hex:i
Why avrdude -e reports a failure that did not happen
“Ignore the error message” is bad advice without a reason, so here is the reason.
avrdude’s USBtiny driver validates every SPI transaction by requiring the target to echo command byte 2 back in
response byte 3. From usbtiny_cmd in src/usbtiny.c:
return nbytes == 4 && res[2] == cmd[1]? LIBAVRDUDE_SUCCESS:
  LIBAVRDUDE_GENERAL_FAILURE;
That holds for AVR parts, and for most AT89S52 instructions, but not for Chip Erase. The AT89S52 begins its
self-timed erase as soon as it has received the second byte of the command, and stops echoing from that point on.
Running the erase with -vvvv shows it byte for byte:
CMD: [ac 53 00 00] [00 ac 53 00]    Programming Enable   res[2] == 0x53 == cmd[1]   accepted
CMD: [28 00 00 00] [00 28 00 1e]    read signature 0     res[2] == 0x00 == cmd[1]   accepted
CMD: [28 01 00 00] [00 28 01 52]    read signature 1                                accepted
CMD: [28 02 00 00] [00 28 02 06]    read signature 2                                accepted
Device signature = 1E 52 06 (AT89S52)
CMD: [ac 80 00 00] [00 ac 00 00]    Chip Erase           res[2] == 0x00 != 0x80     rejected
Error main() main.c 1864: chip erase failed
Every command up to and including the three signature reads satisfies res[2] == cmd[1]. Chip Erase sends 0x80 as
byte 2 and gets 0x00 back, the check fails, and avrdude aborts, after the part has already started erasing. The
erase itself completes. Only avrdude’s reading of the reply is wrong, and the zero-length readback above is the
proof.
Two things look like they should help here and do not. -F does not force past it, because main.c aborts on any
nonzero return from avr_chip_erase() without consulting the force flag at all. And it is not a timing problem: the
echo check runs before usleep(p->chip_erase_delay), so raising chip_erase_delay above the 250 ms that avrdude.conf ships (the datasheet suggests around 500 ms) changes nothing. I tried it.
The STK500v1 driver behind -c avrisp applies no such echo check, which is consistent with avrdude.conf’s note
that the part was tested with -c avrisp. The check encodes an AVR-specific assumption that predates avrdude
shipping MCS-51 parts at all, so it is probably worth an upstream issue.
Installing avrdude
On Windows:
pip install meson ninja
winget install --id AVRDudes.AVRDUDE -e
SDCC is not packaged for winget. Install it from the SDCC downloads page,
same as the rest of this series.
There is one winget-specific gotcha, and it does matter here. Winget puts an avrdude.exe symlink on PATH under WinGet\Links, and that shim fails to locate avrdude.conf when invoked directly from a shell. avrdude -c '?' reports an empty programmer list, and -p 89s52 fails as a result. Since flashing in this project is a manual
command rather than a ninja target, you will hit it. Point PATH at the real install directory instead:
$env:PATH = "$env:LOCALAPPDATA\Microsoft\WinGet\Packages\AVRDudes.AVRDUDE_Microsoft.Winget.Source_8wekyb3d8bbwe;$env:PATH"
You may have to register your programmer on Windows with the appropriate Zadig driver.
On Linux (Debian/Ubuntu):
sudo apt install sdcc meson ninja-build avrdude
Debian and Ubuntu 24.04 (“noble”) both package avrdude 7.1+dfsg, comfortably past the 7.0 cutoff for AT89S52
support. On an older release, check avrdude -v. Below 7.0, build from source rather than relying on the distro
package. If your ISP programmer is USB-based (USBtinyISP, USBasp), you will typically also need udev rules granting
your user access to the device, e.g. adding yourself to the plugdev group, or a rule matching the programmer’s
vendor and product ID, to avoid running avrdude as root.
Where this stands
Programming an AT89S52 with SDCC and avrdude on the same dev-kit as the rest of this series works, verified end to
end on hardware. avrdude has carried official AT89S51/AT89S52 support since 7.0 (March 2023), SDCC’s -mmcs51 output does not care which 8051 clone it is targeting, and the HC6800-ES already has a socketed MCU and an ISP1 header wired for exactly this. 205 bytes of 09_hello written and verified over a USBtinyISP.
The two things that cost time, neither of which shows up in the obvious documentation:
- The AT89S52 programs with RST high, and every AVR ISP programmer drives RESET low. avrdude only compensates on
the STK500v1 path, via a device code the
ArduinoISP sketch reads back. Anything else needs an inverter, or a
jumper plus some care not to short VCC through your programmer’s output stage. avrdude -c usbtiny -p 89s52 -e always reports chip erase failed, and the erase always worked. It is an
AVR-specific echo check in avrdude’s USBtiny driver meeting an 8051 instruction that stops echoing mid-command.
So with this out of the way, what NDAA-compliant thing will you build out of an ancient 8-bit microcontroller?
Published: 2026-03-14
Updated : 2026-03-14
Not a spam bot? Want to leave comments or provide editorial guidance? Please click any
of the social links below and make an effort to connect. I promise I read all messages and
will respond at my choosing.